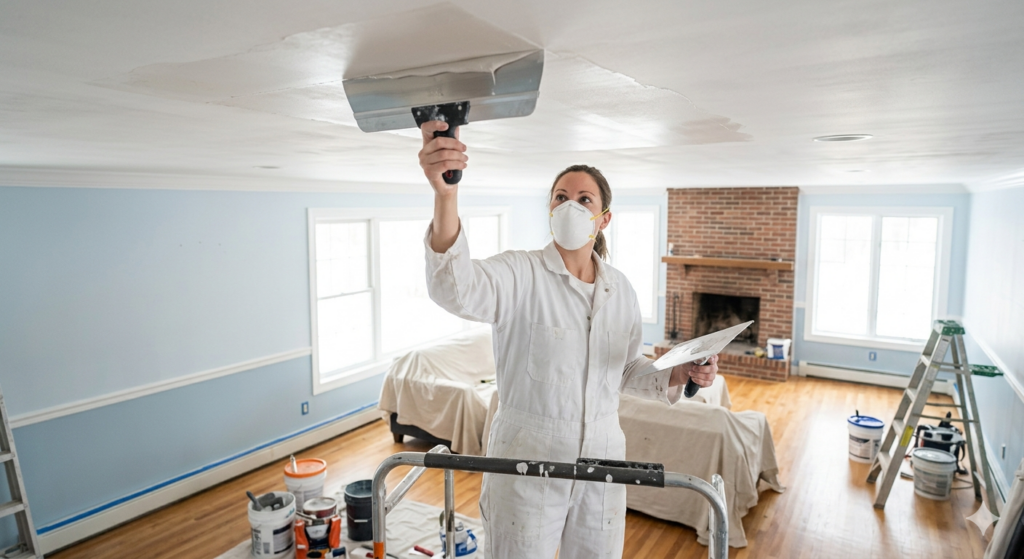
A skim coat ceiling involves applying a thin layer of joint compound over the entire surface to create a smooth, uniform finish.
This technique transforms rough, damaged, or textured ceilings into flawless canvases ready for painting. You can achieve professional results by using the right materials, proper tools, and correct application methods.
Whether you have popcorn texture, minor cracks, or simply want a modern smooth finish, applying a skim coat ceiling treatment offers a cost-effective solution compared to full ceiling replacement.
The process typically takes 2-3 days including drying time, requires basic drywall skills, and produces lasting results when done correctly.
Professional painters in Winnipeg can complete this work efficiently while ensuring proper surface preparation, even application, and a defect-free finish that will enhance your home’s appearance for years to come.
What is a Skim Coat Ceiling?
A skim coat ceiling refers to a finishing technique where you spread a very thin layer of joint compound across the entire ceiling surface. This method creates a smooth, even base for painting by filling small imperfections, hiding texture, and covering minor damage.
The compound layer is typically just 1/8 inch thick or less. Unlike traditional plastering which builds up multiple thick layers, a skim coat ceiling application focuses on surface refinement rather than structural repair.
Professional painters use specialized joint compound designed for skim coating. This material spreads easily, dries quickly, and sands smoothly. The consistency is thinner than standard drywall mud but thicker than paint.
Common reasons homeowners choose a skim coat ceiling:
- Removing outdated popcorn or knockdown textures
- Covering repaired areas to match surrounding surfaces
- Hiding minor cracks, dents, or surface flaws
- Creating a modern, smooth finish for contemporary homes
- Preparing old plaster ceilings for fresh paint
The technique works on various ceiling materials including drywall, plaster, and previously textured surfaces. Before applying a skim coat ceiling treatment, you need to prepare the surface properly by cleaning, repairing major damage, and priming if necessary.
How Does Skim Coating Differ from Regular Plastering?
Skim coating and plastering serve different purposes despite using similar materials. Understanding these differences helps you choose the right approach for your ceiling project.
Plastering builds up ceiling surfaces with multiple thick coats, often 1/4 to 1/2 inch per layer. This method repairs significant damage, creates new surfaces, or adds structural strength. Plasterers typically apply three coats: a scratch coat, brown coat, and finish coat.
A skim coat ceiling uses just one or two very thin applications, each less than 1/8 inch thick. This technique focuses solely on creating a smooth finish over existing, structurally sound surfaces. The material dries faster and requires less expertise than traditional plastering.
| Feature | Skim Coating | Plastering |
| Thickness | 1/16 to 1/8 inch | 1/4 to 1/2 inch per coat |
| Number of Coats | 1-2 thin layers | 3 coats (scratch, brown, finish) |
| Drying Time | 24-48 hours total | 5-7 days or more |
| Primary Purpose | Smooth finish on sound surfaces | Repair damage, build new surfaces |
| Material Cost | Lower (less compound needed) | Higher (more material, multiple coats) |
| Skill Level | Moderate (can be DIY) | Advanced (professional recommended) |
For a skim coat ceiling project, you apply the compound in sweeping motions with a wide trowel or drywall knife. The goal is covering the surface with the minimum amount of material needed for smoothness.
Traditional plastering requires more skill in mixing, applying multiple layers, and achieving proper cure times between coats. Plasterers often work with lime plaster or gypsum plaster rather than the joint compound used for skim coating.
Most residential ceiling projects need only a skim coat ceiling treatment rather than full plastering. True Coat’s experienced team can assess your ceiling and recommend whether skim coating or more extensive drywall repair makes sense for your situation.
When Should You Skim Coat a Ceiling?
Deciding whether to apply a skim coat ceiling depends on the current condition of your surface and your desired outcome. Not every ceiling needs this treatment, but certain situations make it the ideal solution.
You should consider a skim coat ceiling when:
- Your ceiling has outdated popcorn or heavy texture you want removed
- Small cracks, dents, or surface imperfections cover the ceiling
- You have completed drywall repairs and need to blend patches
- The existing surface is rough but structurally sound
- You want a modern, smooth finish for painting
- Previous paint jobs left visible roller marks or texture
- Water stains have been repaired and need covering
The ceiling must be structurally sound before skim coating. Large cracks, sagging sections, or water damage require proper repairs first. A skim coat ceiling covers only minor surface issues, not serious structural problems.
Signs Your Ceiling Needs Skim Coating
Look for these indicators that a skim coat ceiling treatment would benefit your space:
Texture you dislike: Popcorn ceilings, heavy knockdown, or orange peel textures make rooms feel dated. A smooth skim coat ceiling creates a contemporary look.
Visible repairs: If you have patched holes or cracks, the repaired areas often show through paint. Skim coating blends everything into a uniform surface.
Surface irregularities: Run your hand across the ceiling. Bumps, ridges, or rough patches indicate the need for smoothing. Paint cannot hide these flaws.
Multiple paint layers: Decades of painting can create an uneven buildup. A skim coat ceiling evens out these variations.
Minor damage: Small dents from moving furniture, hairline cracks from settling, or nail pops all disappear under a properly applied skim coat ceiling.
However, skip skim coating if you notice sagging drywall, active water leaks, major cracks wider than 1/4 inch, or mold growth. These issues need proper repairs before any skim coat ceiling application.
The best interior painting companies evaluate your ceiling carefully before recommending skim coating. True Coat provides free estimates and honest assessments to ensure you get the right solution for your situation.
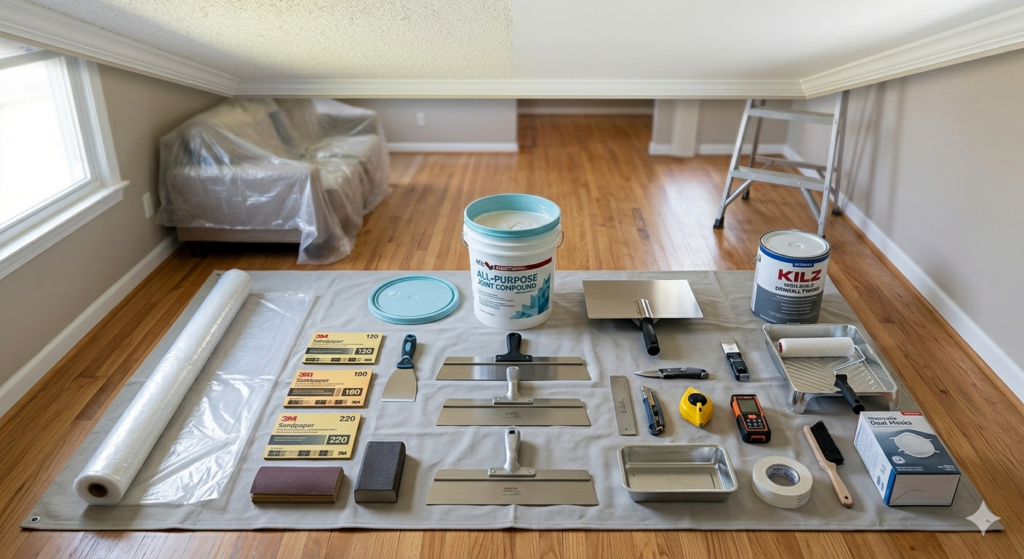
Materials and Tools Needed for a Skim Coat Ceiling
Success with a skim coat ceiling starts with having the right supplies. Professional results require quality materials and proper tools for application.
Essential Materials
Joint Compound: Choose pre-mixed all-purpose joint compound or lightweight topping compound specifically designed for skim coating. Topping compound spreads more easily and creates a smoother finish. You need about one gallon per 50-60 square feet of ceiling.
Primer: Apply primer before skim coating if your ceiling has stains, repairs, or different surface materials. Use primer again after the skim coat ceiling dries to seal the compound before painting.
Sandpaper: Stock 120-grit and 220-grit sandpaper for smoothing between coats and final finishing. Finer grits create the smoothest surfaces.
Protective Materials: Cover floors and furniture with drop cloths. Use painter’s tape to protect walls where they meet the ceiling.
Required Tools
Trowels and Knives: A 12 to 14-inch drywall trowel or wide putty knife applies the compound in smooth, even strokes. Have a 6-inch knife for corners and edges.
Mud Pan: This container holds your working supply of joint compound and makes it easy to load your trowel.
Pole Sander: Attach sandpaper to a pole sander for reaching the ceiling without a ladder. This saves time and creates more even sanding.
Mixing Tools: If using powder compound, you need a mixing bucket and drill with a paddle attachment.
Safety Equipment: Wear safety glasses to protect eyes from falling compound and dust. A dust mask prevents inhaling particles during sanding.
Lighting: A bright work light angled across the ceiling reveals imperfections as you work. Proper lighting is critical for seeing ridges, bumps, or thin spots in your skim coat ceiling application.
Professional painters often use specialized tools like automatic taping blades or skimming blades that make application faster and more consistent. For a single room, basic tools work fine.
How to Apply a Skim Coat Ceiling: Step-by-Step Process
Applying a skim coat ceiling requires patience and technique. Follow these steps for professional results.
Surface Preparation
Start by removing furniture or covering it completely with drop cloths. Protect walls with painter’s tape at the ceiling line.
Clean the ceiling thoroughly. Remove dust, cobwebs, and grease using a damp cloth or sponge. Allow it to dry completely. Dirt prevents the skim coat ceiling from adhering properly.
Repair major damage before skim coating. Fill large cracks or holes with joint compound and let them dry. Sand repairs smooth. A skim coat ceiling covers minor flaws but cannot fix serious structural issues.
If your ceiling has glossy paint, lightly sand the entire surface to create texture for the compound to grip. Vacuum or wipe away all sanding dust.
Apply primer if needed. Primer seals stains, repairs, and different materials so they do not show through your skim coat ceiling. Let primer dry according to manufacturer instructions.
Applying the First Coat
Mix or stir your joint compound until smooth and creamy. The consistency should spread easily but not drip from your trowel.
Load your trowel with a generous amount of compound. Starting in a corner, spread the material across the ceiling in long, smooth strokes. Hold your trowel at a 15 to 20-degree angle to the ceiling.
Apply thin, even layers. The goal is coverage, not thickness. Work in sections about 3 feet wide, overlapping each stroke slightly with the previous one.
Do not worry about perfection on the first coat. Focus on covering the entire ceiling with a thin, consistent layer. Small ridges or trowel marks are normal at this stage.
Keep your trowel clean by wiping it frequently. Built-up compound creates ridges in your skim coat ceiling.
Work quickly but carefully. Joint compound begins to set within 20-30 minutes. Do not try to rework areas that have started drying.
Smoothing and Additional Coats
Allow your first skim coat ceiling application to dry completely, usually 24 hours. The compound changes from dark to light as it dries.
Once dry, inspect the surface under bright light angled across the ceiling. You will see high spots, ridges, or areas needing more coverage.
Sand the dried first coat lightly with 120-grit sandpaper on a pole sander. Knock down any ridges or bumps. Do not sand away too much material. Vacuum or wipe away all dust.
Apply a second thin coat following the same process as the first. This coat fills any remaining imperfections and creates your final smooth surface. Many skim coat ceiling projects need only two coats.
For seriously damaged or heavily textured ceilings, a third coat may be necessary. Always let each layer dry completely before adding the next.
Final Sanding and Finishing
After the final coat dries completely (wait 24-48 hours), sand the entire skim coat ceiling with 220-grit sandpaper. Use gentle, circular motions to create an ultra-smooth finish.
Check your work with bright light from different angles. Feel the surface with your hand to find any remaining imperfections.
Wipe down the ceiling with a slightly damp cloth to remove all sanding dust. Let it dry completely.
Apply primer over your completed skim coat ceiling. This seals the compound and provides the ideal surface for paint. Without primer, paint may soak into the compound unevenly, creating blotchy results.
Once primer dries, your ceiling is ready for paint. True Coat offers professional interior painting services that ensure your newly smoothed ceiling gets a flawless finish.
Common Mistakes to Avoid with a Skim Coat Ceiling
Even experienced DIYers make errors that compromise their skim coat ceiling results. Knowing these pitfalls helps you avoid them.
Applying compound too thick: The most common mistake is using too much material. A skim coat ceiling should be thin, around 1/16 to 1/8 inch. Thick applications take forever to dry, shrink excessively, and crack as they cure. Multiple thin coats always work better than one thick layer.
Skipping surface preparation: Failing to clean, repair, or prime properly causes the skim coat ceiling to bubble, peel, or show imperfections. Preparation takes time but determines the quality of your final result.
Working too slowly: Joint compound begins setting quickly. If you spend too much time perfecting one area, the material becomes difficult to spread and leaves visible marks. Work at a steady pace, covering the entire ceiling before going back to fix details.
Inadequate drying time: Rushing between coats creates a weak bond and can cause the skim coat ceiling to crack or separate. Always wait the full recommended drying time, usually 24 hours between coats.
Poor lighting while working: Without proper lighting, you cannot see ridges, thin spots, or other flaws until after the compound dries. Always use bright work lights angled across your skim coat ceiling as you apply each coat.
Insufficient sanding: Skipping sanding or using too coarse a grit leaves the surface rough. Sand between coats with 120-grit paper and finish with 220-grit for the smoothest result.
Not priming before painting: Paint applied directly to joint compound soaks in unevenly, creating flat spots and shiny areas. Always prime your skim coat ceiling before painting.
For complex ceiling projects, hiring experienced professionals eliminates these common mistakes. The team at True Coat has completed hundreds of skim coat ceiling projects throughout Winnipeg, ensuring perfect results every time. Contact us for a free quote.
Benefits of a Skim Coat Ceiling
Choosing to skim coat a ceiling offers several advantages over other ceiling finishing methods.
Creates a Modern, Smooth Finish
A skim coat ceiling transforms dated textured surfaces into contemporary smooth finishes. This update immediately modernizes any room and increases home value.
Smooth ceilings reflect light better than textured ones, making rooms appear brighter and larger. The clean look complements modern design styles and provides a neutral backdrop for any decor.
Cost-Effective Solution
Compared to replacing drywall or installing new ceiling materials, a skim coat ceiling costs significantly less. You save on materials and labor while achieving similar results.
For removing popcorn texture, skim coating costs about 30-50% less than tearing out and replacing the entire ceiling. The process creates less mess and takes less time than full replacement.
Hides Minor Imperfections
Small cracks, dents, nail pops, and surface irregularities disappear under a properly applied skim coat ceiling. The thin layer fills and levels these flaws without the expense of major repairs.
This benefit makes skim coating ideal for older homes where minor settling has created hairline cracks or for ceilings that have been patched multiple times.
Improves Paint Adhesion and Appearance
A smooth skim coat ceiling provides the perfect surface for paint. The even texture allows paint to spread uniformly, creating consistent color and sheen.
Without texture or imperfections, paint coverage improves. You may need fewer coats to achieve your desired finish, saving money on paint.
Long-Lasting Results
When properly applied and maintained, a skim coat ceiling lasts for decades. The joint compound forms a durable surface that resists normal wear and minor impacts.
Unlike wallpaper or ceiling tiles that can peel or sag, a skim coat ceiling becomes part of the ceiling structure itself. With occasional repainting, it continues looking fresh indefinitely.
Many homeowners in Winnipeg choose True Coat for their skim coating needs because our experienced team delivers these benefits consistently. We specialize in transforming old, textured ceilings into beautiful smooth surfaces. Learn more about our skim coating services.
Potential Drawbacks of Skim Coat Ceilings
While a skim coat ceiling offers many benefits, you should understand the potential downsides before starting your project.
Time-Consuming Process
Applying a skim coat ceiling properly requires patience. Each coat needs 24 hours to dry before you can sand or add another layer. A typical project takes 2-4 days from start to finish, not including painting.
For homeowners wanting quick results, this timeline can feel frustrating. You cannot use the room normally during application and drying, and dust from sanding requires careful cleanup.
Skill Required for Professional Results
Achieving a perfectly smooth skim coat ceiling demands technique and practice. Beginners often struggle with even application, avoiding visible trowel marks, and creating a uniform thickness.
Poor application shows clearly after painting. Ridges, thin spots, and uneven areas become obvious under certain lighting. Fixing mistakes requires sanding and recoating, adding more time to the project.
Messy Application
Working overhead with joint compound creates dust and drips. Despite protective coverings, cleanup takes considerable time and effort.
Sanding generates fine dust that spreads throughout your home. Even with careful containment, you will likely spend hours vacuuming and wiping surfaces after completing your skim coat ceiling.
Not Suitable for All Ceiling Problems
A skim coat ceiling only works on structurally sound surfaces. It cannot fix sagging drywall, serious water damage, or major cracks caused by structural issues.
If your ceiling has active leaks, mold, or significant damage, you need proper repairs first. Applying a skim coat ceiling over serious problems wastes time and money because the underlying issues will continue causing damage.
May Not Last on Poor Preparation
Inadequate surface preparation causes the skim coat ceiling to fail prematurely. Compound applied over dirt, grease, or loose paint eventually bubbles, cracks, or peels away.
The success of your skim coat ceiling depends entirely on proper preparation. Skipping steps to save time often leads to redoing the entire project.
For these reasons, many homeowners hire professionals instead of attempting DIY skim coating. True Coat’s painters have the skills, tools, and experience to overcome these challenges and deliver smooth, lasting results. We work efficiently to minimize disruption to your home while ensuring every detail meets our high standards. Get started with a free estimate.
How Long Does a Skim Coat Ceiling Last?
A properly applied skim coat ceiling lasts as long as the drywall or plaster beneath it, typically 20-30 years or more with normal care. The longevity depends on application quality, environmental conditions, and maintenance.
Factors affecting lifespan:
Application quality: A skim coat ceiling applied by experienced professionals using proper techniques and materials lasts indefinitely. Poor application with inadequate preparation fails within a few years as the compound separates from the ceiling.
Surface preparation: Ceilings properly cleaned, repaired, and primed before skim coating provide the best adhesion. The compound bonds permanently to well-prepared surfaces.
Environmental conditions: Stable humidity and temperature extend the life of your skim coat ceiling. Excessive moisture from leaks or humidity causes joint compound to soften, crack, or develop mold. Temperature extremes cause expansion and contraction that can crack the finish.
Structural movement: Normal house settling creates minor cracks in any ceiling over time. A skim coat ceiling handles typical movement well, but significant structural shifts or foundation problems cause visible damage.
Maintenance and care: Regular painting protects your skim coat ceiling from moisture and stains. Prompt repair of any ceiling damage prevents small problems from spreading.
Most skim coat ceiling failures result from moisture exposure, not material breakdown. Water leaks from roofs, plumbing, or condensation damage joint compound quickly. Fix any moisture sources immediately to protect your ceiling.
Impact damage from moving furniture, installing fixtures, or children playing can dent or crack a skim coat ceiling. These localized issues are easily repaired with spot patching and blending.
The joint compound itself does not deteriorate over time when protected from moisture. Your skim coat ceiling should outlast several paint jobs and continue looking smooth for decades.
True Coat stands behind our workmanship with a 3-year craftsmanship warranty on all completed projects. Our experienced team ensures proper application techniques that maximize the lifespan of your skim coat ceiling. Contact us for professional ceiling finishing that lasts.
DIY vs. Professional Skim Coat Ceiling Application
Deciding whether to tackle a skim coat ceiling yourself or hire professionals depends on your skills, available time, and desired results.
DIY Skim Coating: What to Consider
Skill level required: Skim coating looks simple but demands practice to master. Beginners often struggle with even application and avoiding visible trowel marks. Your first skim coat ceiling probably will not look professional without prior experience.
Time investment: Count on spending several full days on preparation, application, drying, sanding, and cleanup. Most DIYers underestimate the time needed and rush steps, compromising results.
Physical demands: Working overhead for hours strains your neck, shoulders, and arms. The repetitive motions and awkward positions cause fatigue and soreness, especially if you lack experience.
Cost savings: DIY saves on labor but requires tool and material purchases. For a single room, savings may be modest after buying everything needed. Mistakes that require redoing work can eliminate any cost advantage.
Learning curve: Your first skim coat ceiling will likely need extra sanding, additional coats, or touch-ups. Gaining proficiency takes practice on multiple projects.
Professional Skim Coating: Benefits
Expertise and experience: Professional painters have completed hundreds of skim coat ceiling projects. They know proper techniques, avoid common mistakes, and work efficiently.
Quality results: Professionals achieve smooth, flawless finishes that DIYers struggle to match. The difference becomes obvious after painting when lighting reveals every imperfection.
Proper tools and materials: Professional painters use specialized tools that improve application speed and quality. They know which products work best for specific situations.
Time efficiency: What takes a DIYer 4-5 days, professionals complete in 1-2 days. They work systematically and do not waste time correcting mistakes.
Less mess and hassle: Professionals handle all cleanup, protect your home properly, and minimize disruption to your daily routine.
Warranty protection: Reputable painting companies like True Coat warranty their work. If problems develop, they fix them at no additional cost.
For small, simple ceilings in low-visibility areas like closets or laundry rooms, DIY skim coating makes sense if you have patience and basic drywall skills. Practice on these less important surfaces before attempting main living areas.
For living rooms, bedrooms, kitchens, or any space where ceiling appearance matters, professional application ensures results you will be proud of. The modest additional cost delivers significantly better outcomes and saves you days of difficult work.
True Coat’s experienced team makes skim coating stress-free. We handle every detail from preparation through final cleanup, delivering perfectly smooth ceilings ready for painting. Our competitive pricing and quality workmanship make professional service the smart choice for most homeowners. Request your free quote today.
Skim Coating vs. Other Ceiling Finishing Methods
Several options exist for creating smooth ceiling surfaces. Understanding how a skim coat ceiling compares to alternatives helps you choose the right approach.
| Method | Best For | Cost Range | Time Required | Durability |
| Skim Coat Ceiling | Covering texture, minor repairs, smooth finish | Moderate | 2-4 days | Excellent (20+ years) |
| Ceiling Replacement | Serious damage, sagging, structural issues | High | 3-7 days | Excellent (30+ years) |
| Ceiling Tiles | Covering damage, hiding utilities, soundproofing | Moderate to High | 2-3 days | Good (10-20 years) |
| Texture Removal Only | Eliminating popcorn without smoothing | Low to Moderate | 1-2 days | Varies (existing surface quality) |
| Paint Only | Minor discoloration, no texture issues | Low | 1 day | Good (3-7 years) |
Ceiling replacement involves removing old drywall and installing new sheets. This makes sense for seriously damaged, sagging, or moldy ceilings that cannot be saved with a skim coat ceiling. Replacement costs 2-3 times more than skim coating but provides a completely fresh surface.
Ceiling tiles (drop ceiling or glue-up tiles) hide damage and imperfections without repair. They install quickly and conceal pipes or wiring. However, they reduce ceiling height, look less elegant than a skim coat ceiling, and can appear dated.
Texture removal alone scrapes away popcorn or other texture but leaves the underlying surface. This works if the base is already smooth. Most older ceilings need a skim coat ceiling after texture removal to achieve a modern smooth finish.
Paint only addresses surface appearance. It cannot hide texture, cracks, or damage. If your ceiling has no texture and minimal imperfections, painting alone may suffice. Otherwise, you need a skim coat ceiling first.
For most homeowners wanting to update dated textured ceilings or create smooth modern surfaces, a skim coat ceiling offers the best balance of cost, time, and results. It costs less than replacement while delivering similar appearance.
True Coat helps you evaluate which method suits your ceiling best. Our team provides honest assessments and explains your options clearly. We never recommend unnecessary work. Learn more about our complete range of ceiling and wall finishing services.
Maintaining Your Skim Coat Ceiling
Proper care keeps your skim coat ceiling looking fresh and extends its lifespan.
Regular cleaning: Dust settles on ceilings just like other surfaces. Vacuum or dust your skim coat ceiling every few months using a soft brush attachment. This prevents buildup that dulls the paint finish.
Gentle cleaning methods: For stains or marks, use a slightly damp sponge with mild soap. Avoid harsh chemicals or abrasive cleaners that can damage the finish. Never scrub aggressively.
Prompt leak repair: Address any roof leaks, plumbing issues, or condensation problems immediately. Water damages joint compound quickly, causing stains, softening, or mold growth. Fix the source first, then repair any damaged areas.
Touch-up painting: Repaint your skim coat ceiling every 5-7 years to maintain appearance and protect the compound. Fresh paint seals the surface and prevents moisture penetration.
Minor damage repair: Small cracks or dents happen over time from normal house settling or impacts. Repair these spots promptly with a thin layer of joint compound. Sand smooth and touch up with paint to prevent further damage.
Monitor for problems: Inspect your skim coat ceiling periodically for new cracks, stains, or sagging. Early detection allows simple repairs before problems worsen.
With minimal maintenance, your skim coat ceiling continues looking beautiful for decades. The durable finish resists normal wear and requires less care than textured ceilings that trap dust and dirt.
True Coat offers ongoing painting and maintenance services to keep your ceilings looking their best. Our team can handle minor repairs, repainting, or any touch-ups needed. Check out our residential painting services for complete home care.
Cost of Skim Coat Ceiling Installation
The cost to skim coat a ceiling varies based on several factors including ceiling size, condition, height, and whether you hire professionals or DIY.
Several elements influence the final price:
Ceiling size: Larger ceilings require more materials and labor. Pricing typically ranges from $1.50 to $3.50 per square foot for professional installation.
Ceiling condition: Heavily damaged or textured ceilings need more preparation and possibly additional coats, increasing costs. Simple smoothing over minor imperfections costs less than removing thick popcorn texture first.
Ceiling height: Standard 8-9 foot ceilings cost less than vaulted or cathedral ceilings requiring scaffolding or special equipment.
Number of coats: Most skim coat ceiling projects need two coats. Severely damaged surfaces requiring three or more coats increase material and labor costs.
Additional repairs: Fixing large cracks, water damage, or structural issues before skim coating adds to the total expense.
Labor costs: Professional application includes surface preparation, multiple coats, sanding, and cleanup. Experienced painters work more efficiently than beginners, potentially saving money despite higher hourly rates.
For precise pricing on your specific skim coat ceiling project, contact True Coat for a free estimate. Our team evaluates your ceiling condition, discusses your goals, and provides transparent pricing with no hidden charges. We offer competitive rates backed by our 3-year craftsmanship warranty. Request your free quote today to learn what your project will cost.
Things to Know About Skim Coat Ceilings
Before starting your skim coat ceiling project, these important points will help you plan effectively:
Temperature matters: Apply joint compound when temperatures are between 55-75°F. Extreme cold or heat affects drying time and compound performance. Avoid skim coating in unheated or non-air-conditioned spaces during temperature extremes.
Ventilation is essential: Proper airflow helps compound dry evenly and removes dust during sanding. Open windows or use fans, but avoid creating strong drafts that dry the surface too quickly causing cracks.
Multiple thin coats beat one thick coat: Always apply several thin layers rather than trying to build up thickness quickly. Thin coats dry faster, shrink less, and create smoother results. Rushing with thick applications guarantees problems.
Gravity works against you: Working overhead is challenging. Joint compound drips, and your arms tire quickly. Take frequent breaks and work in manageable sections. Professional painters make this look easy through practice and proper technique.
Lighting reveals everything: Always use bright work lights angled across the surface while applying compound and after each coat dries. Shadows reveal ridges, thin spots, and imperfections invisible under normal room lighting.
Primer is non-negotiable: Never skip priming before painting your skim coat ceiling. Unprimed compound absorbs paint unevenly, creating flat and glossy patches that look terrible. Quality primer ensures uniform paint coverage and appearance.
Texture adds character: If you prefer some texture over completely smooth surfaces, discuss options with your painter. Professionals can create subtle texture finishes during skim coating that add visual interest while maintaining a modern look.
Consider the whole room: A perfectly smooth ceiling next to textured walls can look odd. Plan your finishing approach for walls and ceiling together to create cohesive room appearance.
For the best results with your skim coat ceiling project, work with experienced professionals who understand these nuances. True Coat’s team has completed countless ceiling projects throughout Winnipeg. We know how to handle every challenge and deliver flawless results. Explore our complete painting and finishing services to see how we can transform your space.
Final Thoughts on Skim Coat Ceilings
A skim coat ceiling transforms dated or damaged ceilings into smooth, modern surfaces ready for fresh paint. This technique offers an affordable alternative to complete ceiling replacement while delivering professional results. Whether you need to remove popcorn texture, hide minor imperfections, or simply create a contemporary smooth finish, skim coating provides an effective solution.
The process requires patience, proper preparation, and attention to detail. While DIY is possible for experienced homeowners, professional application ensures flawless results without the hassle, mess, or time investment. With proper care, your skim coat ceiling will maintain its beautiful appearance for decades.
True Coat specializes in ceiling finishing throughout Winnipeg. Our experienced painters deliver smooth, perfect surfaces that exceed expectations. We handle every detail from preparation through final cleanup, backed by our 3-year craftsmanship warranty. Ready to transform your ceiling? Contact True Coat for a free estimate and experience the difference professional quality makes.
For more information about interior improvements, check out these helpful resources:
Why Should You Hire Interior House Painters for Your Winnipeg Home
How Does Skim Coating a Ceiling Create a Flawless Finish
Best House Painters Winnipeg Homeowners Trust for Quality Results
Frequently Asked Questions
Should you skim coat a ceiling?
You should skim coat a ceiling if it has minor imperfections, outdated texture, or surface damage that needs covering. This technique works perfectly for removing popcorn texture, hiding small cracks, or creating a smooth modern finish. Skim coating makes sense when your ceiling is structurally sound but visually flawed. It costs less than replacement and delivers professional results when properly applied.
What are the disadvantages of skim coat?
The main disadvantages include the time required (2-4 days including drying), skill needed for professional results, and messy application process. Skim coating generates dust during sanding and requires careful surface preparation. It cannot fix serious structural damage, sagging drywall, or active moisture problems. Poor application shows clearly after painting, potentially requiring complete redo. For best results, hire experienced professionals rather than attempting DIY.
What is the difference between plastering and skim coating?
Plastering involves multiple thick coats (1/4 to 1/2 inch each) that build up surfaces and provide structural strength. It requires three separate applications and takes 5-7 days. Skim coating uses just one or two very thin layers (1/16 to 1/8 inch) to create smooth finishes over existing sound surfaces. Skim coating dries in 24-48 hours total, requires less skill, and costs significantly less than traditional plastering.
What is a ceiling skim?
A ceiling skim refers to applying a thin layer of joint compound across the entire ceiling surface to create a smooth, uniform finish. The compound layer is typically 1/16 to 1/8 inch thick and covers texture, minor damage, or surface irregularities. This finishing technique prepares ceilings for painting by providing an even base that eliminates imperfections and creates a contemporary smooth appearance.
How long will a skim coat last?
A properly applied skim coat lasts 20-30 years or more with normal care and maintenance. The lifespan depends on application quality, environmental conditions, and structural stability. Skim coats in stable environments with controlled humidity last indefinitely. Moisture exposure from leaks shortens lifespan significantly. Regular repainting every 5-7 years protects the compound and extends its life. Professional application with proper surface preparation max