How to Skim Coat Ceiling: Complete Guide for Smooth Finishes
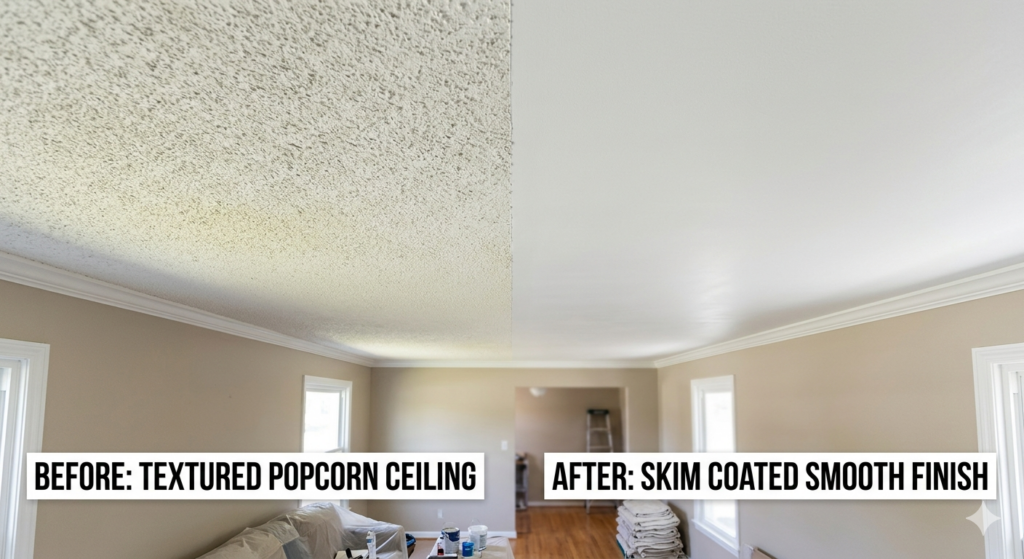
A skim coat ceiling involves applying a thin layer of joint compound over the entire surface to create a smooth, uniform finish. This technique transforms rough, damaged, or textured ceilings into flawless canvases ready for painting. You can achieve professional results by using the right materials, proper tools, and correct application methods. Whether you have popcorn texture, minor cracks, or simply want a modern smooth finish, applying a skim coat ceiling treatment offers a cost-effective solution compared to full ceiling replacement. The process typically takes 2-3 days including drying time, requires basic drywall skills, and produces lasting results when done correctly. Professional painters in Winnipeg can complete this work efficiently while ensuring proper surface preparation, even application, and a defect-free finish that will enhance your home’s appearance for years to come. What is a Skim Coat Ceiling? A skim coat ceiling refers to a finishing technique where you spread a very thin layer of joint compound across the entire ceiling surface. This method creates a smooth, even base for painting by filling small imperfections, hiding texture, and covering minor damage. The compound layer is typically just 1/8 inch thick or less. Unlike traditional plastering which builds up multiple thick layers, a skim coat ceiling application focuses on surface refinement rather than structural repair. Professional painters use specialized joint compound designed for skim coating. This material spreads easily, dries quickly, and sands smoothly. The consistency is thinner than standard drywall mud but thicker than paint. Common reasons homeowners choose a skim coat ceiling: The technique works on various ceiling materials including drywall, plaster, and previously textured surfaces. Before applying a skim coat ceiling treatment, you need to prepare the surface properly by cleaning, repairing major damage, and priming if necessary. How Does Skim Coating Differ from Regular Plastering? Skim coating and plastering serve different purposes despite using similar materials. Understanding these differences helps you choose the right approach for your ceiling project. Plastering builds up ceiling surfaces with multiple thick coats, often 1/4 to 1/2 inch per layer. This method repairs significant damage, creates new surfaces, or adds structural strength. Plasterers typically apply three coats: a scratch coat, brown coat, and finish coat. A skim coat ceiling uses just one or two very thin applications, each less than 1/8 inch thick. This technique focuses solely on creating a smooth finish over existing, structurally sound surfaces. The material dries faster and requires less expertise than traditional plastering. Feature Skim Coating Plastering Thickness 1/16 to 1/8 inch 1/4 to 1/2 inch per coat Number of Coats 1-2 thin layers 3 coats (scratch, brown, finish) Drying Time 24-48 hours total 5-7 days or more Primary Purpose Smooth finish on sound surfaces Repair damage, build new surfaces Material Cost Lower (less compound needed) Higher (more material, multiple coats) Skill Level Moderate (can be DIY) Advanced (professional recommended) For a skim coat ceiling project, you apply the compound in sweeping motions with a wide trowel or drywall knife. The goal is covering the surface with the minimum amount of material needed for smoothness. Traditional plastering requires more skill in mixing, applying multiple layers, and achieving proper cure times between coats. Plasterers often work with lime plaster or gypsum plaster rather than the joint compound used for skim coating. Most residential ceiling projects need only a skim coat ceiling treatment rather than full plastering. True Coat’s experienced team can assess your ceiling and recommend whether skim coating or more extensive drywall repair makes sense for your situation. When Should You Skim Coat a Ceiling? Deciding whether to apply a skim coat ceiling depends on the current condition of your surface and your desired outcome. Not every ceiling needs this treatment, but certain situations make it the ideal solution. You should consider a skim coat ceiling when: The ceiling must be structurally sound before skim coating. Large cracks, sagging sections, or water damage require proper repairs first. A skim coat ceiling covers only minor surface issues, not serious structural problems. Signs Your Ceiling Needs Skim Coating Look for these indicators that a skim coat ceiling treatment would benefit your space: Texture you dislike: Popcorn ceilings, heavy knockdown, or orange peel textures make rooms feel dated. A smooth skim coat ceiling creates a contemporary look. Visible repairs: If you have patched holes or cracks, the repaired areas often show through paint. Skim coating blends everything into a uniform surface. Surface irregularities: Run your hand across the ceiling. Bumps, ridges, or rough patches indicate the need for smoothing. Paint cannot hide these flaws. Multiple paint layers: Decades of painting can create an uneven buildup. A skim coat ceiling evens out these variations. Minor damage: Small dents from moving furniture, hairline cracks from settling, or nail pops all disappear under a properly applied skim coat ceiling. However, skip skim coating if you notice sagging drywall, active water leaks, major cracks wider than 1/4 inch, or mold growth. These issues need proper repairs before any skim coat ceiling application. The best interior painting companies evaluate your ceiling carefully before recommending skim coating. True Coat provides free estimates and honest assessments to ensure you get the right solution for your situation. Materials and Tools Needed for a Skim Coat Ceiling Success with a skim coat ceiling starts with having the right supplies. Professional results require quality materials and proper tools for application. Essential Materials Joint Compound: Choose pre-mixed all-purpose joint compound or lightweight topping compound specifically designed for skim coating. Topping compound spreads more easily and creates a smoother finish. You need about one gallon per 50-60 square feet of ceiling. Primer: Apply primer before skim coating if your ceiling has stains, repairs, or different surface materials. Use primer again after the skim coat ceiling dries to seal the compound before painting. Sandpaper: Stock 120-grit and 220-grit sandpaper for smoothing between coats and final finishing. Finer grits create the smoothest surfaces. Protective Materials: Cover floors and furniture with drop cloths. Use painter’s tape to protect walls where they meet the ceiling. Required