A drywall sander is a tool used to smooth dried joint compound on walls and ceilings, creating a flat, paint-ready surface after repairs or new drywall installation. Choosing the right drywall sander for your project saves time, reduces mess, and delivers a finish that looks clean and professional under paint.
There are several types of drywall sanders available, from basic handheld blocks to electric models with built-in dust collection. The right choice depends on the size of your project, the location of the surface, and how much prep time you want to spend. Getting the grit level right also matters, since using the wrong screen can scratch the surface or leave it too rough for painting.
What Is a Drywall Sander?
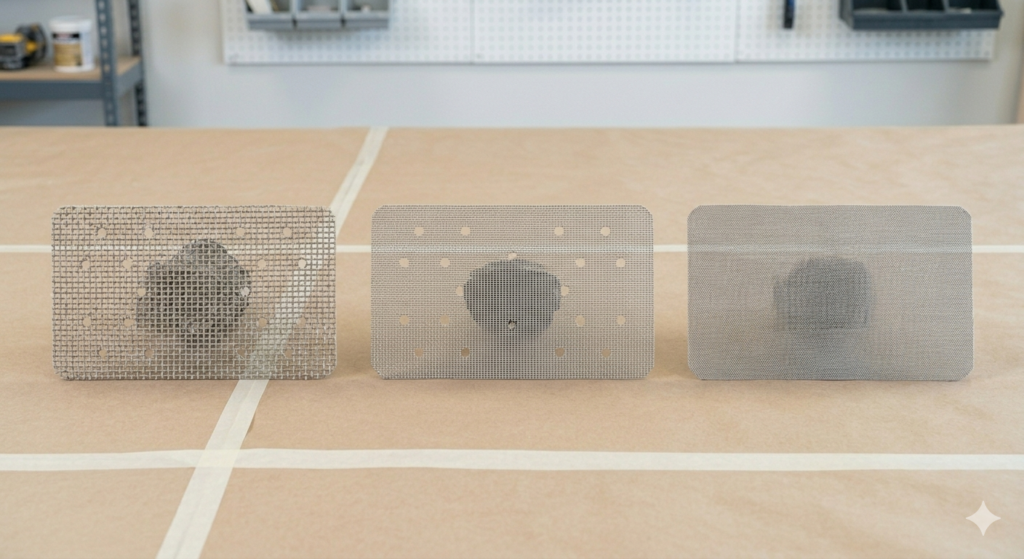
A drywall sander is a tool made specifically for smoothing dried joint compound on drywall surfaces. It is different from a wood sander because it uses mesh screens instead of solid sandpaper. The mesh lets fine compound dust fall through rather than clogging the surface, which keeps the screen cutting evenly for longer.
Joint compound is applied in layers during taping and finishing. Once each coat dries, it leaves ridges, tool marks, and feathered edges that must be sanded flat before paint goes on. Without sanding, these imperfections show through even after multiple coats of paint.
The drywall sander is the tool designed for this step. It covers the surface in even passes, knocking down high spots and blending transitions between the compound and the surrounding wall.
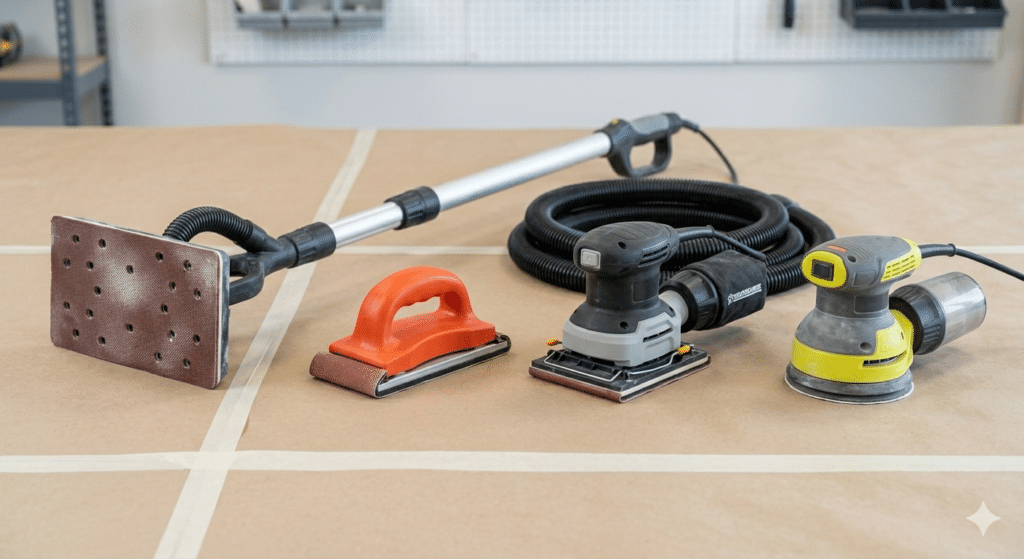
What Are the Different Types of Drywall Sanders?
The type of drywall sander that works best depends on the size of the area, the height of the surface, and how much detail work is involved. Each type has specific strengths.
Pole Drywall Sander
A pole drywall sander has an extendable handle that lets you reach ceilings and high walls without a ladder. The head pivots to follow the wall angle. It is the most popular choice for finishing large flat surfaces because it moves quickly across wide areas and reduces back strain compared to working by hand.
Hand Drywall Sander
A hand drywall sander is a flat block held directly in your palm. It is the right tool for corners, edges, window and door trims, and small repair patches. It gives you full control over pressure and direction, which matters a lot in tight spots where a pole sander cannot fit properly.
Electric Drywall Sander
An electric drywall sander spins or oscillates the sanding head automatically, cutting down on manual effort. Many professional models connect directly to a vacuum for dust-free operation. This type is efficient on large commercial or residential projects where speed and cleanliness both matter.
Orbital Sander on Drywall
An orbital sander is not a dedicated drywall tool, but it works on small patches in a pinch. The circular motion leaves fewer marks than a straight-line sander, but standard sandpaper clogs quickly on joint compound. For anything beyond a single small patch, a proper drywall sander is the better choice.
Here is a quick comparison to help you decide which type fits your project:
| Sander Type | Best For | Key Advantage |
| Pole Drywall Sander | Large walls and ceilings | Covers wide areas, reduces strain |
| Hand Drywall Sander | Corners, edges, small patches | Precise control in tight spots |
| Electric Drywall Sander | Large professional projects | Speed and built-in dust collection |
| Orbital Sander | Small patches, flat surfaces | Versatile, widely available |
How Do You Use a Drywall Sander Correctly?
Using a drywall sander properly is just as important as choosing the right one. Poor technique causes gouges, uneven areas, and extra coats of compound to fix the damage you created.
Start by confirming the joint compound is fully dry. Sanding wet compound clogs the screen fast and tears the surface. A dry coat will look lighter in color and feel firm when you press it lightly.
Set up dust control before you start. Drywall dust spreads quickly and settles on every surface in a room. Seal off doorways with plastic sheeting if needed, and wear a dust-rated respirator.
Attach a 100 to 120 grit screen to your drywall sander for the main smoothing pass. Begin with longer strokes across the flat surface, keeping pressure even throughout. Avoid pressing harder in any single spot as this risks cutting through the compound and into the drywall paper underneath.
After your main pass, hold a work light at a low angle to the wall. This raking light highlights any remaining bumps or depressions. Do a second light pass with 150 grit to bring the surface fully smooth before applying primer.
Which Grit Should You Use on a Drywall Sander?
The screen grit on your drywall sander controls how aggressively it cuts and how smooth the surface ends up. Using the correct grit at each stage makes the whole process faster and protects the wall from damage.
| Grit Level | Stage of Work | What It Does |
| 60 to 80 Grit | First pass, rough sanding | Removes ridges, bumps, and joint lines |
| 100 to 120 Grit | Second pass, smoothing | Blends seams and flattens surface |
| 150 to 180 Grit | Final pass, finishing | Creates a paint-ready smooth finish |
A practical tip: always start with the coarser grit to remove bulk material, then move up to finer screens to refine the finish. Trying to smooth a rough surface with fine grit wastes time and wears out the screen quickly.
Practical Tips for Using a Drywall Sander More Effectively
A few habits make drywall sander work much more manageable, especially for first-time users or anyone doing a large room.
- Use vacuum-attached tools when possible: Electric drywall sanders with dust collection reduce airborne particles significantly compared to dry hand sanding.
- Work in small sections: Focus on two to three square feet at a time instead of sweeping randomly across the whole wall. This prevents missing spots.
- Replace worn screens promptly: A clogged or worn screen on a drywall sander cuts unevenly and requires extra effort. Fresh screens produce cleaner results with less pressure.
- Hand sand all corners: Even when using a pole drywall sander on flat areas, inside corners always need a folded piece of screen or a corner sanding tool for a clean result.
- Apply a thin skim coat if needed: If sanding reveals pitting or torn paper on the drywall face, apply a thin coat of compound, let it cure completely, and sand again.
For more on surface preparation and wall smoothing, read our post on skim coating a ceiling for a flawless finish.
When Is It Better to Hire a Professional for Drywall Sanding?
Not every drywall sander project is a good fit for DIY. Some situations call for professional help, particularly in older Winnipeg homes where walls may have multiple repair layers or hidden damage underneath the compound.
If you are finishing an entire room or several rooms after new installation, the physical effort of sanding is considerable. Renting a quality electric sander makes sense for a single large job. However, if you are unsure about what the surface needs, or if previous texturing or multiple old repairs complicate things, calling a professional saves time and prevents costly correction work.
Professionals bring commercial-grade equipment, proper containment systems, and the experience to spot problems early. When prep work is handled correctly the first time, paint adheres better and the result looks far more finished.
Dealing with more serious wall damage? Read our post on the best drywall repair services in Winnipeg to learn your options.
Things To Know Before You Start Drywall Sanding
A few important points are worth knowing before you pick up a drywall sander for the first time.
- Drywall dust is a respiratory hazard. It contains fine silica particles. Always use a proper respirator, not just a paper dust mask, during extended sanding sessions.
- Wet sanding is a lower-dust alternative. Using a damp sponge instead of a dry drywall sander produces far less airborne dust, though it takes more skill to avoid over-wetting the compound and causing it to sag.
- Thin coats need less sanding. A three-coat finish with thin applications requires much less sanding effort than one heavy coat. Applying compound correctly saves sanding time.
- Priming reveals remaining flaws. A coat of drywall primer sometimes highlights low spots or rough areas that seemed invisible after sanding. Light touch-up sanding after priming is normal and expected before painting.
- Do not sand in high humidity. Damp air slows compound drying. Sanding before the coat is fully cured tears the surface and clogs screens almost immediately.
True Coat Provides Expert Drywall and Painting Services in Winnipeg
True Coat is a fully licensed and insured painting and decorating company serving Winnipeg, Manitoba. From drywall and plaster repair to full interior painting services, the True Coat team delivers quality workmanship backed by a 3-year craftsmanship warranty.
Whether your project involves a single patched wall or a complete room refresh, True Coat handles every step with care, from surface preparation through the final coat of paint. Transparent pricing, free estimates, and a team of experienced professionals make the process straightforward from start to finish.
Contact True Coat today for a free, no-obligation estimate on your drywall or painting project.
Once your walls are smooth and ready, explore our post on why hiring interior house painters in Winnipeg makes a difference.
Getting the Best Results from Your Drywall Sander
A drywall sander is one of the most important tools in any wall finishing workflow. Knowing which type suits your project, which grit to use at each stage, and how to move it correctly transforms a rough, patched surface into something that is genuinely ready for paint.
For Winnipeg homeowners who want a polished result without the guesswork, True Coat offers professional drywall repair, skim coating, and painting services. Whether you need one smooth wall or an entire home prepared, the right drywall sander technique and skilled hands behind it make all the difference.
Frequently Asked Questions About Drywall Sanders
What is the best type of sander for drywall?
A pole drywall sander is the best all-around choice for walls and ceilings.
For most home projects, a pole drywall sander handles flat walls and ceilings without requiring a ladder, and covers large surfaces quickly. For corners or tight spots, a hand sanding block is the better fit. On large professional jobs, an electric drywall sander with dust collection saves the most time and keeps the workspace cleaner.
What is the easiest way to sand drywall?
Use a pole drywall sander with 120 grit screen in long, even strokes after compound is fully dry.
Wait until the compound has completely cured, then attach a 120 grit screen to a pole drywall sander and work in consistent overlapping passes. Keep pressure light and even. Finish by checking your work with a raking light to spot any remaining high spots before moving on to primer.
Should I use a sander on drywall?
Yes, sanding is a required step before painting drywall.
A drywall sander is the correct tool for smoothing dried compound before applying primer and paint. Skipping this step leaves ridges and seams that show clearly through paint, no matter how many coats you apply. Sanding properly ensures paint looks even and the surface holds up over time.
What is the difference between a drywall sander and an orbital sander?
A drywall sander uses mesh screens for compound; an orbital sander uses solid sandpaper for wood and general surfaces.
A drywall sander is designed with mesh screens that allow compound dust to fall through instead of clogging the abrasive. An orbital sander uses standard sandpaper sheets that load up quickly on joint compound. A drywall sander also has a larger sanding surface and extended handle options that an orbital tool does not offer, making it far more practical for wall and ceiling work.
How to sand drywall without a sander?
Use a hand sanding block with 120 grit screen, or a damp sponge for a low-dust option.If a drywall sander is not available, wrap 120 grit sandpaper or mesh screen around a flat sanding block and work by hand using even pressure. For very small areas, a damp sponge smooths the compound before it fully hardens with almost no airborne dust. For anything beyond a single small patch, renting or borrowing an actual drywall sander is much more practical and gives a better result.