Deck staining protects your outdoor investment from harsh Canadian weather while enhancing your home’s curb appeal.
The best approach combines proper surface preparation, choosing quality products suited to Winnipeg’s climate, and applying stain during dry conditions between 10°C and 27°C.
Most homeowners achieve professional results by cleaning the deck thoroughly, sanding rough spots, and using a combination of brushing and rolling techniques for even coverage.
Whether you’re tackling deck staining for the first time or looking to improve your technique, understanding the right methods and timing makes all the difference.
A properly stained deck can last 2-4 years before needing maintenance, saving you money and protecting your wood investment. Ready to transform your outdoor space?
Why Deck Staining Matters for Winnipeg Homes
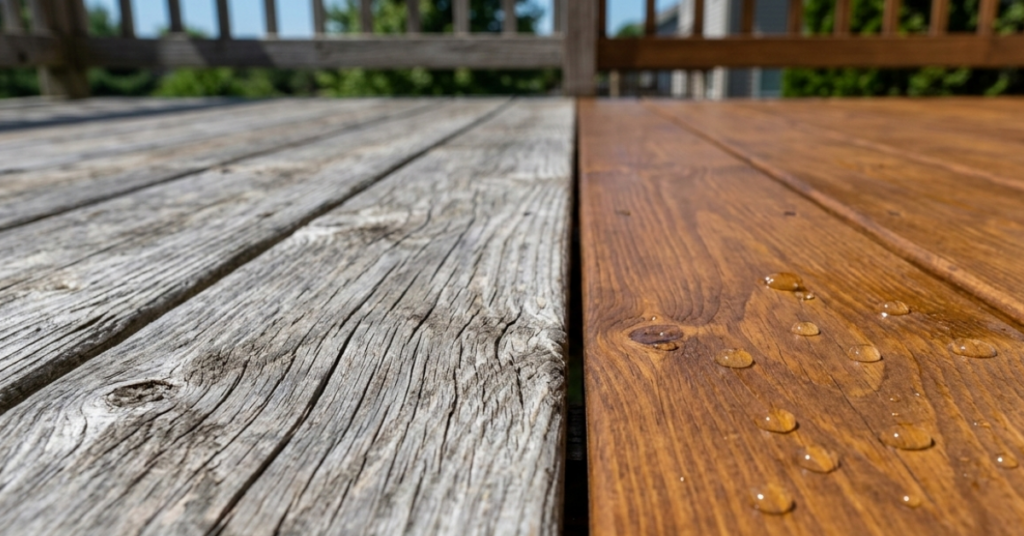
Your deck faces extreme temperature swings, intense UV exposure during summer months, and moisture from rain and snow throughout the year. Without proper protection, wood deteriorates quickly, leading to costly repairs or complete replacement.
Deck staining creates a barrier against moisture penetration. When water seeps into wood fibers, it causes swelling, cracking, and eventual rot. Manitoba’s freeze-thaw cycles accelerate this damage, making regular deck staining essential for longevity.
UV rays break down wood lignin, turning your deck gray and brittle. Quality stain contains UV blockers that slow this degradation process significantly. Interior painting services protect your home’s inside, but deck staining does the same job for your outdoor living space.
Beyond protection, deck staining enhances natural wood grain and adds rich color that complements your home’s exterior. A well-maintained deck increases property value and creates an inviting space for summer gatherings.
Many Winnipeg homeowners find that residential painting and deck staining projects together dramatically improve their home’s overall appearance.
What’s the Best Way to Do Deck Staining?
The most effective deck staining method combines multiple application techniques for thorough, even coverage. Start with a clean, dry surface, then use a combination of brushing, rolling, and back-brushing to work stain into wood grain.
Surface Preparation Steps
Proper preparation determines how well your deck staining project turns out and how long it lasts. Skip these steps, and you’ll see peeling and uneven color within months.
First, sweep away all debris, leaves, and dirt. Use a stiff broom to get between deck boards where grime accumulates. Next, wash the entire surface with a deck cleaner designed to remove mildew, dirt, and old stain residue.
Power washing works well but requires caution. Hold the nozzle 12 inches from the surface and use a fan tip, not a concentrated stream. Too much pressure damages wood fibers, creating a fuzzy surface that absorbs stain unevenly. Many homeowners working with best house painters in Winnipeg learn this technique prevents damage.
After washing, let your deck dry completely for 48-72 hours depending on weather conditions. Test moisture levels by sprinkling water on the surface. If it beads up, the wood isn’t ready. If it soaks in, you’re good to proceed.
Sand any rough spots, splinters, or raised grain using 80-grit sandpaper. This creates a smooth surface that accepts stain evenly. Pay special attention to railings and high-traffic areas that see more wear.
Application Techniques That Work for Deck Staining
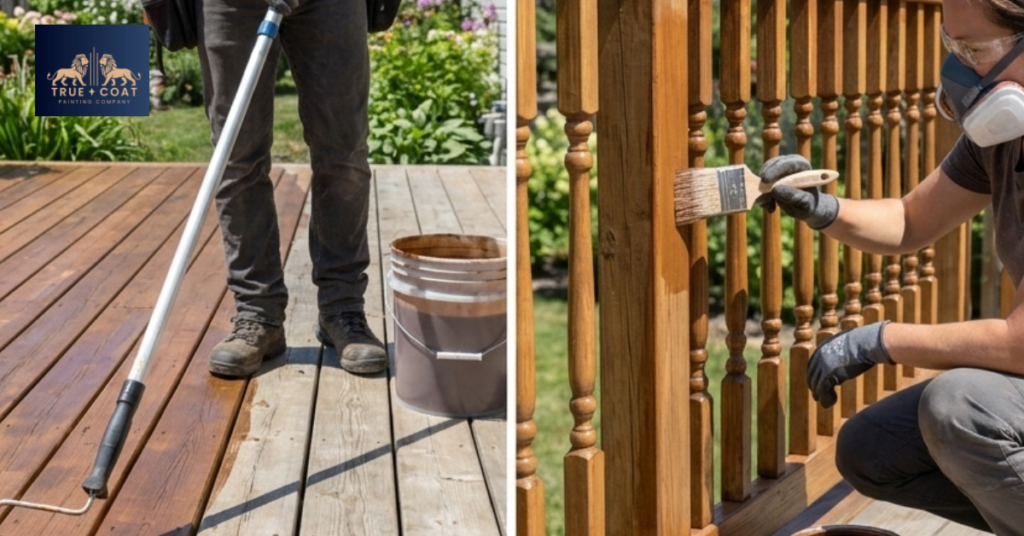
The brush and roll method delivers the best results for deck staining. Pour stain into a paint tray, then load a roller with a thick nap cover (3/4 inch works well for textured wood).
Roll stain onto 3-4 deck boards at a time, working in manageable sections. Immediately follow with a brush to work stain into cracks, grooves, and grain patterns. This back-brushing technique ensures complete penetration and even color.
For railings and balusters, brush application works better than rolling. Load your brush moderately to avoid drips and runs. Work from top to bottom, and wipe away excess immediately with a clean rag.
Apply stain in the direction of the wood grain, never against it. This follows natural wood patterns and creates a professional finish. Overlap each section slightly to avoid visible lines where new stain meets dried areas.
Common Application Mistakes:
- Applying too much stain at once (causes puddling and uneven drying)
- Working in direct sunlight (stain dries too fast for proper absorption)
- Skipping railings and vertical surfaces (these need protection too)
- Not maintaining a wet edge (creates lap marks)
How Many Coats Do You Need?
Most deck staining projects require two coats for optimal protection and color depth. The first coat seals and primes the wood, while the second coat provides rich color and additional weather resistance.
Wait for the first coat to dry according to manufacturer instructions, typically 4-24 hours depending on temperature and humidity. Test dryness by touching an inconspicuous spot. If it feels tacky, wait longer.
Some heavily weathered decks or new wood may need three coats for complete coverage. However, more isn’t always better. Thick buildup can peel and flake, creating more problems than it solves.
| Deck Condition | Recommended Coats | Notes |
| New wood | 2 coats | Absorbs stain quickly, needs sealing |
| Previously stained (1-2 years) | 1-2 coats | Depends on existing condition |
| Heavily weathered | 2-3 coats | May need primer for severe damage |
| High-traffic areas | 2-3 coats | Extra protection for stairs, walkways |
Best Time to Stain a Deck for Long-Lasting Deck Staining Results
The optimal time for deck staining in Winnipeg falls between late May and early September, when temperatures consistently stay between 10°C and 27°C. You need at least 48 hours of dry weather before application and 24-48 hours after to allow proper drying and curing.
Seasonal Considerations for Winnipeg Climate
Late spring offers excellent conditions as wood has dried from winter moisture and temperatures stabilize. However, watch for late frosts that can affect curing. June through August provides the most reliable weather windows, though intense heat requires adjusting your schedule.
Early morning and late afternoon work best during summer months. Avoid deck staining in direct midday sun, as stain dries too quickly and doesn’t penetrate properly. Just like exterior painting projects, timing makes all the difference in results.
Early fall can work if you complete the project before nighttime temperatures drop below 10°C. Cold temperatures slow drying and curing, potentially leaving your deck vulnerable to early winter weather.
Daily Weather Factors That Impact Deck Staining
Check the forecast for a 5-day window of dry conditions. Rain within 48 hours of application washes away uncured stain, forcing you to start over. Humidity should stay below 85% for optimal drying.
Wind affects deck staining by causing rapid surface drying before stain penetrates. On windy days, work in smaller sections and adjust your technique to prevent lap marks. Light breezes are fine, but strong winds call for rescheduling.
Temperature swings matter too. If morning temperatures are 12°C but afternoons reach 28°C, plan your work during the moderate morning hours. Consistent temperatures throughout the drying period produce the best results.
What’s the Best Stain for Durable Deck Staining?
Choosing the right deck staining product depends on your wood type, desired appearance, and protection level. The three main categories are transparent, semi-transparent, and solid stains, each offering different benefits for Winnipeg’s climate.
Transparent vs. Semi-Transparent vs. Solid Stain
Transparent stains showcase natural wood grain while providing minimal color and basic UV protection. They work well on newer decks or exotic hardwoods where you want natural beauty to shine through. However, they require more frequent reapplication, typically every 1-2 years.
Semi-transparent stains balance color and wood visibility. They offer moderate UV protection while still letting grain patterns show through. Most homeowners prefer this option for deck staining as it combines aesthetics with durability, lasting 2-4 years between applications.
Solid stains provide maximum protection and coverage, similar to paint but thinner. They hide imperfections, weathering, and gray wood, making them ideal for older decks. While they obscure wood grain completely, they offer the longest protection, often lasting 4-5 years.
For Winnipeg homes, semi-transparent and solid stains handle weather extremes better than transparent options. The additional pigment provides more UV protection during long summer days and better moisture resistance during wet springs and falls.
Oil-Based vs. Water-Based Formulas for Deck Staining
Oil-based stains penetrate deeply into wood fibers, providing excellent moisture resistance and rich color depth. They take longer to dry (24-48 hours) but create a durable finish that stands up to heavy traffic. The downside? Stronger odors during application and more difficult cleanup requiring mineral spirits.
Water-based stains dry faster (4-6 hours), have less odor, and clean up easily with soap and water. Modern formulas have improved significantly, offering comparable durability to oil-based products. They resist mildew better and don’t darken as much over time.
For deck staining in Manitoba’s climate, both work well. Oil-based stains edge ahead for heavily trafficked decks or extreme weather exposure. Water-based products excel when you need faster project completion or have environmental concerns.
| Stain Type | Protection Level | Reapplication Timeline | Best For |
| Transparent (oil) | Low | 1-2 years | New or exotic wood, natural look |
| Semi-transparent (oil) | Medium | 2-4 years | Most decks, balanced appearance |
| Semi-transparent (water) | Medium | 2-3 years | Quick projects, easy maintenance |
| Solid (oil) | High | 4-5 years | Old decks, maximum protection |
| Solid (water) | High | 3-4 years | Fast drying, less odor |
Features to Look For
Quality deck staining products contain UV inhibitors, mildew resistance, and water repellents. Read labels carefully to ensure you’re getting these protective additives, not just color.
Check the coverage rate listed on the container. Premium stains typically cover 150-300 square feet per gallon on smooth surfaces, less on rough or weathered wood. Calculate your deck area and buy accordingly, plus 10% extra for touch-ups.
Look for stains specifically formulated for horizontal surfaces. These contain more wear-resistant additives than vertical siding stains. Some products even specify “deck and fence” to clarify their intended use.
True Coat works with premium brands proven to withstand Manitoba weather. For detailed product recommendations and pricing specific to your deck, contact our team for expert guidance.
Is It Better to Spray or Roll Deck Stain?
Rolling combined with back-brushing produces superior results for most deck staining projects. While spraying works faster on large areas, it wastes product, creates overspray issues, and doesn’t push stain into wood grain as effectively. Professional painters typically reserve spraying for specific situations where rolling isn’t practical.
The Roll and Brush Method
This technique gives you the best of both worlds: coverage speed and thorough penetration. Use a thick-nap roller (3/4 inch) to quickly apply stain across deck boards. Immediately follow behind with a brush to work stain into cracks, knots, and grain patterns.
The brush stroke forces stain deeper into wood pores where it can’t just sit on the surface. This extra penetration extends protection and prevents early failure. Many painting companies in Winnipeg recommend this approach for residential deck staining.
Work in sections of 3-4 boards at a time. Roll stain onto the surface, then brush it in before moving to the next section. This maintains a wet edge and prevents lap marks where dried and wet stain meet.
For railings, balusters, and vertical surfaces, brushing works better than rolling. These areas need careful attention to avoid drips and runs. A quality brush allows precise control that rollers can’t match.
When Spraying Makes Sense
Sprayers excel on very large decks where rolling would take days. They also work well for complex railing systems with many spindles and decorative elements. However, spraying requires more preparation and protection for surrounding areas.
If you choose to spray, always back-brush immediately after application. This crucial step works stain into the wood rather than leaving it sitting on top. Without back-brushing, sprayed stain often fails prematurely.
Spraying generates significant overspray that drifts onto siding, windows, landscaping, and neighboring properties. You’ll spend considerable time masking these areas. For most residential deck staining projects, the prep time negates any speed advantage.
Equipment costs add up too. Decent HVLP sprayers suitable for deck staining run several hundred dollars. Rental options exist, but daily rates plus cleaning time may not justify the investment for a typical deck.
Pros and Cons Comparison
Rolling + Brushing:
- Excellent stain penetration
- Minimal overspray and waste
- Easy cleanup and equipment costs
- Better control on edges and details
- Slightly slower on very large surfaces
Spraying:
- Fastest application on large, open areas
- Reaches difficult spots like lattice
- Requires extensive masking
- More product waste (up to 30%)
- Needs immediate back-brushing for proper results
- Equipment investment required
Most homeowners and professional contractors choose rolling and brushing for residential deck staining. The superior results and simpler process outweigh any time savings from spraying.
What Not to Do When Staining a Deck
Avoiding common mistakes saves you time, money, and frustration. Many deck staining failures result from rushing preparation or ignoring weather conditions rather than poor products or techniques.
Preparation Mistakes to Avoid
Never apply deck staining over dirty surfaces. That thin layer of pollen, mildew, or dust creates a barrier preventing stain penetration. The stain bonds to the dirt layer instead of wood, leading to rapid peeling and failure within months.
Don’t skip the drying period after cleaning. Wet or damp wood can’t absorb stain properly. The moisture in wood fibers prevents stain from penetrating, resulting in surface adhesion that flakes off quickly. Test moisture content before starting your project.
Avoid power washing at high pressure or getting too close to the surface. Damaged wood fibers create a fuzzy texture that makes smooth stain application impossible. If you do see fuzzing after washing, sand it smooth before continuing.
Never ignore existing paint or solid stain buildup. Deck staining works on bare or previously stained wood, not over thick paint layers. You must strip paint completely or commit to repainting rather than staining.
Application Errors That Cause Problems
Don’t over-apply stain thinking more is better. Thick applications puddle in low spots and take forever to dry. Excess stain that doesn’t penetrate remains sticky and tracks into your home on shoes. Apply thin, even coats that soak in completely.
Avoid working in direct sunlight or during temperature extremes. Hot surfaces cause stain to dry before penetrating. Cold conditions slow drying to a crawl, leaving your deck vulnerable to dew, rain, or foot traffic damage. Similar to interior painting, temperature control affects results significantly.
Never stain only the horizontal surfaces while ignoring railings, posts, and undersides. Water attacks from all angles. Unprotected areas rot first, compromising structural integrity. Complete coverage protects your entire investment.
Don’t rush between coats. Each layer needs adequate drying time before the next application. Trapping moisture between coats causes adhesion problems and uneven color. Follow manufacturer drying time recommendations strictly.
Maintenance Mistakes
Avoid letting your deck go too long between maintenance applications. Once the finish fails and wood starts graying, you’re looking at extensive preparation work. Regular touch-ups every 2-3 years take far less effort than complete restoration after 5-7 years of neglect.
Don’t use furniture polish or cleaners containing oils on stained decks. These products create slippery surfaces and interfere with future deck staining projects. Plain soap and water handle most cleaning needs perfectly.
Never ignore small areas of damage or wear. Water penetrates through minor failures and spreads damage underneath surrounding stain. Touch up problem spots promptly to prevent major issues. The best exterior painters know that preventive maintenance saves money long-term.
How to Choose Between DIY and Professional Deck Staining
Many Winnipeg homeowners successfully handle their own deck staining projects, but some situations benefit from professional expertise. Understanding when each approach makes sense helps you make the right choice for your circumstances.
When DIY Makes Sense
Smaller decks under 300 square feet suit DIY deck staining well. You can complete the project in a weekend with basic tools and moderate physical ability. If you enjoy hands-on home improvement and have the time to do thorough preparation, DIY offers significant savings.
Newer decks in good condition require less preparation work, making them ideal for first-time DIY stainers. When the wood is relatively smooth and free from damage, you can focus on learning proper application techniques without dealing with complicated repairs.
Single-level decks with simple railing systems minimize technical challenges. You won’t need scaffolding, specialty equipment, or advanced carpentry skills to access all surfaces. Simple rectangular designs allow steady progress without complex angles or built-in features.
Your schedule flexibility matters too. Deck staining requires multiple days of dry weather and uninterrupted work time. If you can monitor weather forecasts and adjust your plans, DIY becomes more practical.
When to Hire Professionals
Large or multi-level decks demand considerable time and physical stamina. Professional crews complete these projects faster with consistent quality across the entire surface. The efficiency often justifies the cost difference, especially for decks over 500 square feet.
Severely weathered or damaged decks need expert assessment and repair before staining. Professionals spot structural issues you might miss and know how to address them properly. Staining over hidden problems just masks failures that will worsen over time.
Complex designs featuring custom railings, built-in planters, multiple staircases, or intricate patterns benefit from experienced hands. Professionals navigate these challenges daily and deliver clean, professional results that DIYers struggle to match.
Limited mobility or physical concerns make professional services worth considering. Deck staining involves significant bending, kneeling, reaching, and repetitive motion. If these activities cause pain or difficulty, hiring help makes sense.
True Coat brings years of deck staining experience to Winnipeg homes. Our team handles every aspect from preparation through final inspection, ensuring results that protect your investment. We use premium products proven in Manitoba’s climate and back our work with a solid warranty. Contact True Coat today for a free estimate on your deck staining project.
Things to Know Before Starting Your Deck Staining Project
Planning ahead prevents surprises and ensures smooth project execution. These practical considerations help you prepare properly and set realistic expectations for your deck staining work.
Timing Requirements: Block out 3-5 days for a complete deck staining project on a typical residential deck. This includes 1 day for cleaning and prep, 1 day for drying, 1-2 days for stain application, and 1-2 days for curing before foot traffic resumes. Weather delays can extend this timeline significantly.
Material Calculations: Measure your deck area accurately, including railings, stairs, and vertical surfaces. Most stains cover 150-300 square feet per gallon on smooth surfaces, but rough or weathered wood absorbs more. Buy 10-15% extra to ensure you don’t run short mid-project.
Tool and Supply Checklist:
- Deck cleaner and stiff brush or power washer
- Roller with extension pole and thick-nap covers
- Quality brush for detail work
- Stain appropriate for your wood and climate
- Painter’s tape and drop cloths
- Sandpaper or sanding block (80-grit)
- Rags for wiping excess
- Gloves and eye protection
Furniture and Plant Protection: Remove all furniture, planters, and decorations before starting. Cover or move plants within 10 feet of the deck, as cleaning solutions and stain drips can damage foliage. Store furniture away from the work area where it won’t get splashed during prep work.
Access Considerations: Ensure you can reach all deck surfaces safely. Stairs, undersides, and high railings may require ladders or platforms. Don’t risk injury trying to reach awkward spots. If access seems dangerous, that’s a sign to call professionals.
Neighbor Notification: Let adjacent property owners know about your deck staining project, especially if you’re using a sprayer. Overspray can drift onto their property, and cleaning solutions have strong odors. Good communication prevents conflicts and maintains relationships.
Pet and Child Safety: Keep children and pets away from the work area during application and drying. Fresh stain contains chemicals that can irritate skin and shouldn’t be ingested. Even “safe” water-based products need adequate ventilation during use.
Warranty Documentation: Save receipts for all materials and take photos of each project stage. This documentation proves you followed manufacturer guidelines if warranty claims become necessary. It also helps when planning future maintenance or repairs.
Long-term Maintenance Planning: Set reminders for annual deck inspections and plan for reapplication every 2-4 years depending on stain type. Regular maintenance costs far less than letting your deck deteriorate to the point of needing replacement boards or structural repairs.
Many homeowners combine deck staining with other exterior improvements. Just as choosing quality house painters improves your home’s appearance, proper deck maintenance enhances outdoor living space and property value.
Wrapping Up Your Deck Staining Project
Proper deck staining protects your outdoor investment while creating beautiful living space you’ll enjoy for years. By following the right preparation steps, choosing quality products suited to Winnipeg’s climate, and applying stain during optimal weather conditions, you achieve professional results that last.
Remember that successful deck staining combines several key elements: thorough cleaning and drying, careful product selection, proper application techniques using both rolling and brushing, and appropriate timing during moderate temperatures. Avoid common mistakes like rushing preparation, working in poor weather, or over-applying product, and your deck will reward you with years of low-maintenance beauty.
Whether you tackle deck staining as a DIY project or hire professionals, understanding these principles helps you make informed decisions and recognize quality work. Regular maintenance every 2-4 years preserves your deck’s appearance and structural integrity far more affordably than major repairs or replacement.
Ready to get started? True Coat provides expert deck staining services throughout Winnipeg. Our experienced team delivers consistent results backed by proper insurance and workmanship warranties. From choosing the right stain to final inspection, we handle every detail professionally. Request your free estimate today and discover how True Coat can transform your outdoor space.
Frequently Asked Questions
What is the best method to stain a deck?
The best method combines rolling and back-brushing for even coverage and deep penetration. Roll stain onto 3-4 boards at a time using a thick-nap roller, then immediately brush it in following the wood grain. This technique works stain deep into wood fibers while maintaining an even appearance. Proper surface preparation beforehand matters just as much, requiring thorough cleaning, complete drying, and light sanding of rough areas before application begins.
What is the best time to stain a deck?
The optimal time for deck staining falls between late May and early September when temperatures stay between 10°C and 27°C consistently. You need at least 48 hours of dry weather before application and 24-48 hours after for proper curing. Early morning or late afternoon works best during summer to avoid direct sun, which causes stain to dry too quickly. Check forecasts carefully and plan around extended periods of stable, moderate weather.
What’s the best stain to put on a deck?
Semi-transparent stains offer the best balance of protection and natural wood appearance for most Winnipeg decks, lasting 2-4 years between applications. For older or heavily weathered decks, solid stains provide maximum protection and hide imperfections while lasting 4-5 years. Choose oil-based formulas for deep penetration and rich color, or water-based products for faster drying and easier cleanup. Always select stains specifically formulated for horizontal surfaces with UV protection and mildew resistance for Manitoba’s climate.
Is it better to spray or roll deck stain?
Rolling combined with brushing produces better results than spraying for most deck staining projects. This method pushes stain deep into wood grain for superior protection and even coverage while minimizing waste. Spraying works faster on very large decks but requires extensive masking, wastes more product through overspray, and still needs back-brushing for proper penetration. The roll-and-brush technique gives homeowners better control and costs less in equipment while delivering professional-quality results.
What not to do when staining a deck?
Never stain over dirty surfaces or damp wood, as this prevents proper stain penetration and causes early failure. Avoid working in direct sunlight or temperature extremes that interfere with drying. Don’t over-apply stain thinking more is better, as excess product puddles and remains sticky. Skip staining during forecasted rain within 48 hours, don’t ignore railings and vertical surfaces, and never rush between coats before adequate drying. Following manufacturer instructions and weather guidelines prevents most common deck staining failures.