What Is a Painting Edger and How Does It Work for Clean Paint Lines?
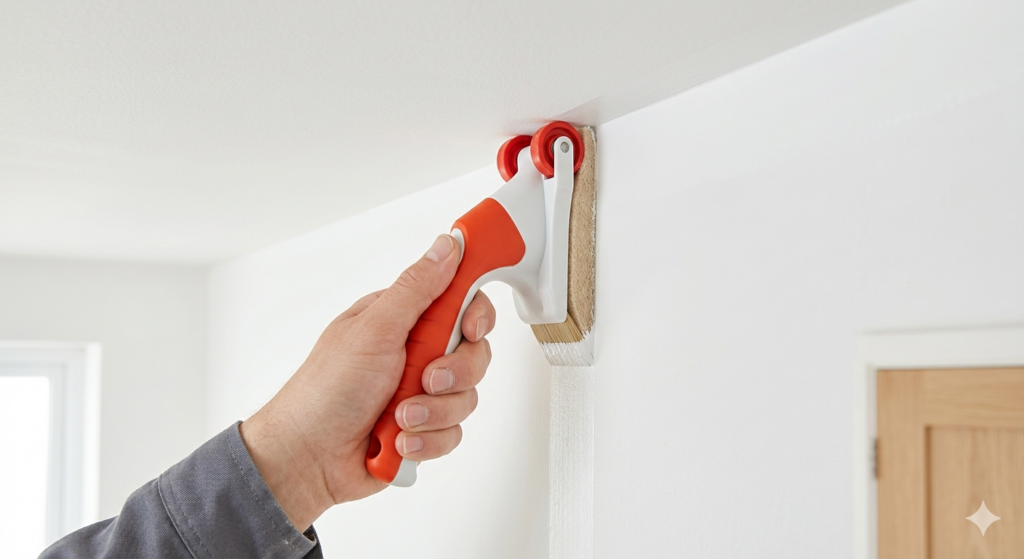
A painting edger is a handheld tool designed to apply paint along edges, corners, baseboards, and ceiling lines without needing painter’s tape. It gives you straight, clean paint lines by guiding the paint applicator right up to a boundary surface without bleeding over. Whether you are touching up a single wall or repainting an entire room, a painting edger saves time, reduces mess, and helps anyone achieve a professional-looking finish. It works for both beginners doing DIY projects and experienced painters who want faster, cleaner results. Choosing the right type, loading it correctly, and keeping it clean are what separate a sharp result from a frustrating one. What Is a Painting Edger? A painting edger is a specialized paint applicator that lets you cut in cleanly along edges without freehand skill or masking tape. Most models feature a flat paint pad or small roller attached to a frame with guide wheels or a plastic shield on the sides. The wheels ride along the adjacent surface, such as a ceiling or baseboard, keeping the pad at a consistent distance so the paint line stays straight. This tool is especially useful in spaces where two different colours meet, such as where the wall meets the ceiling, around door frames, along window trim, or above baseboards. Without a painting edger, those areas typically require steady brush control or careful taping, both of which demand either experience or a lot of prep time. The painting edger was created to make edging accessible for everyone. Even someone with no painting experience can produce a tidy line using one, as long as the tool is loaded properly and moved at a steady pace. It eliminates most of the common causes of uneven lines, including hand shake, over-brushing, and inconsistent pressure, making it one of the most practical additions to any paint kit. How Does a Painting Edger Work? Using a painting edger is straightforward once you understand the mechanics behind it. The guide wheels do the positioning work for you, so your job is simply to keep a smooth pace and manage your paint load. Here is the general process: One practical tip: wipe the guide wheels with a damp cloth after every few passes. Paint can build up on the wheels and transfer to the adjacent surface, leaving marks where you do not want them. For best results, always test the painting edger on a spare piece of cardboard or an inconspicuous area before committing to your wall. This lets you check the paint load and pressure before it matters. Types of Painting Edger Tools Not all painting edger options are built the same. Choosing the right type depends on your project, your surface type, and your comfort level with painting tools. Pad Painting Edgers These use a foam or fabric pad to apply paint. They hold a good amount of paint and glide smoothly along flat surfaces. Best for large wall areas near baseboards or along ceilings where you need consistent coverage over a long run. A pad painting edger is usually the easiest type to learn on and works well for standard interior rooms with smooth walls. Roller Painting Edgers A mini roller version of the standard tool, it lays paint on quickly and works well on textured walls. Some include an angled roller to reach corners more easily. The roller painting edger leaves a slightly more textured finish than a pad edger, which can actually blend better if your main walls are rolled rather than brushed. Brush-Style Edging Tools These look like a traditional paintbrush but have a built-in guide or shield on one side. They give more control on curved or irregular trim, such as ornate door frames or window moulding where other edger types cannot follow the shape accurately. If your home has detailed architectural trim, a brush-style painting edger gives you flexibility that a pad or roller cannot match. Electric or Battery-Powered Painting Edgers Battery-operated models spin a small pad or roller automatically. They are faster than manual tools and reduce hand fatigue on large projects. These suit intermediate or experienced users who want a consistent finish on big rooms without spending extra time on each pass. Type Best For Skill Level Pad Edger Flat surfaces, ceilings, baseboards Beginner Roller Edger Textured walls, quick coverage Beginner to Intermediate Brush-Style Edger Curved or detailed trim Intermediate Electric Edger Large rooms, high volume work Intermediate to Advanced Painting Edger vs. Painter’s Tape: Which Is Better? Both tools help you get clean paint lines, but they work differently and suit different situations. Understanding where each one shines helps you avoid wasted time and uneven results. Painter’s tape requires you to apply strips carefully along every edge before painting, let the paint dry, and then peel back the tape. If the tape is not pressed down firmly at every point, paint bleeds underneath and ruins the line. It also takes considerably more time to set up and remove, especially in a large room with lots of trim or multiple colour changes. A painting edger skips the tape entirely. You load it with paint, position the guide wheels, and start painting right away. For most straightforward edging jobs, such as painting a wall next to white trim or running a line along a ceiling, it is noticeably faster and just as clean when used correctly. However, tape still has real advantages. On highly textured surfaces, a painting edger’s wheels can sit unevenly and leave a crooked line. Tape conforms better in those cases. Tape is also the safer choice when you need to fully protect a surface, such as wallpaper or a stained wood panel, where even a small amount of bleed would cause damage. For smooth walls in standard rooms, a painting edger wins on speed. For complex surfaces or delicate boundaries, tape remains the more reliable option. Many painters actually use both on the same job: the edger for the main runs and tape on tricky corners or textured spots where