How To Install Drywall Over Plaster Walls Successfully
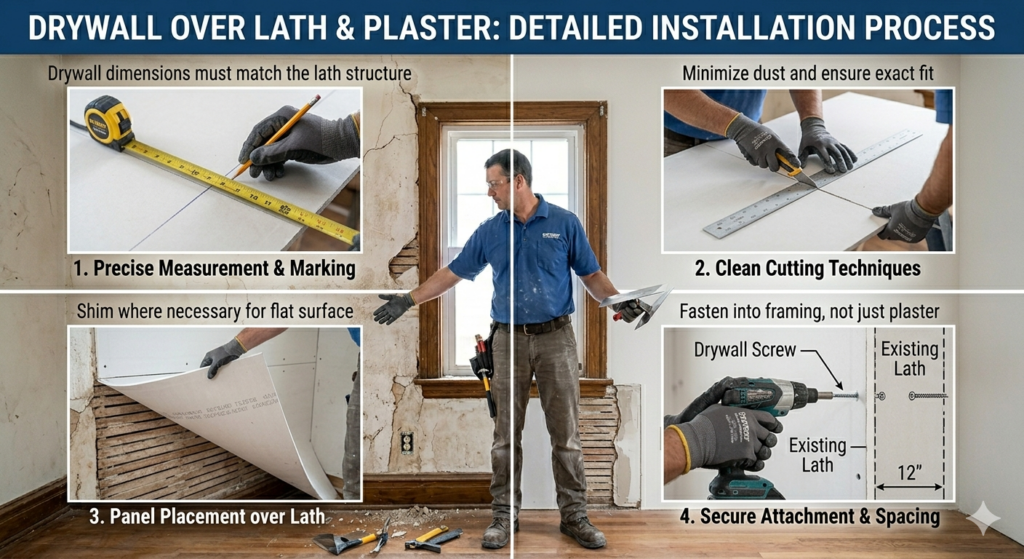
Drywall over plaster offers homeowners a practical solution for updating old walls without the mess and expense of complete plaster removal. This renovation method involves placing modern drywall sheets directly on top of existing plaster surfaces, creating smooth, fresh walls ready for painting. The process works particularly well in older Winnipeg homes where plaster shows age through cracks, uneven surfaces, or outdated textures. Success depends on proper wall assessment, correct installation techniques, and understanding when this approach makes sense. The method requires checking wall stability, addressing moisture issues, and ensuring adequate support. From preparation to finishing, knowing how to execute this technique correctly transforms aging rooms into modern spaces. What Is Drywall Over Plaster Drywall over plaster refers to the renovation technique of installing new drywall sheets directly onto existing plaster walls rather than removing the old plaster first. This method creates a fresh surface for painting and decorating while avoiding the dust, debris, and labor involved in tearing out plaster. The approach works by fastening drywall panels to wall studs through the existing plaster layer. The technique has become popular in older homes where plaster walls remain structurally sound but show cosmetic problems like cracks or outdated textures. Instead of dealing with challenging plaster removal, homeowners can cover these imperfections with smooth, modern drywall. The new layer provides a clean slate while maintaining existing wall structure. Understanding when this method makes sense requires evaluating current walls. If plaster remains firmly attached to the lath beneath and shows no signs of major damage, covering it with drywall can be an efficient choice. Why Choose Drywall Over Plaster For Your Walls Selecting drywall over plaster as your renovation approach offers multiple advantages for homeowners dealing with aging plaster surfaces. The drywall over plaster benefits extend beyond convenience to include cost savings and improved functionality. The most obvious advantage of drywall over plaster involves avoiding extensive mess created by plaster removal. By installing new sheets on existing surfaces instead, you eliminate this disruptive phase entirely. Cost represents another significant factor favoring drywall over plaster installations. This renovation typically costs considerably less because you skip demolition. For accurate pricing, contact True Coat for a detailed estimate. Speed of completion favors this installation method. This faster timeline means less disruption and quicker enjoyment of renovated spaces. Additional insulation comes as a bonus benefit. The existing plaster layer adds thermal mass to walls. When installing new panels on top, you can also add insulation materials in gaps, further improving energy efficiency. Future repairs become simpler with drywall surfaces. For professional guidance on whether this approach suits your renovation, True Coat’s experienced team can assess your walls. When Should You Install Drywall Over Plaster Determining whether to pursue this method requires careful evaluation of existing wall conditions. Several factors help identify when this approach works best. Good Candidates For This Installation Structurally sound plaster represents the ideal candidate. If your plaster remains firmly attached to the lath beneath with no hollow-sounding areas when tapped, it can support new drywall installation. Minor surface cracks, small holes, or cosmetic damage do not disqualify walls since new panels will cover these imperfections. Walls with outdated textures like heavy stippling or popcorn finishes work perfectly. Rather than attempting to remove these textured surfaces, covering them with smooth drywall provides quick transformation. Rooms undergoing complete renovation benefit from this approach. If you plan to update electrical or add insulation, installing new sheets fits naturally into the larger project. Situations Requiring Different Approaches Moisture damage disqualifies walls from this treatment. If you notice water stains, soft spots, or ongoing moisture problems, address these issues first. Installing new material over moisture-damaged surfaces traps the problem, leading to mold growth. Extensively damaged plaster with large sections loose or detached needs removal rather than covering. Hollow-sounding areas indicate separation from lath backing. Severely uneven walls may require removal. If plaster surfaces show extreme waves or bulges exceeding half an inch, new drywall may follow these contours. For expert assessment, exploring professional drywall services helps determine whether this method makes sense. How To Prepare Walls For Drywall Over Plaster Installation Proper preparation determines whether your drywall over plaster project succeeds. Taking time to prepare surfaces correctly ensures new panels perform well for years. Clean all wall surfaces thoroughly. Remove loose paint, wallpaper, or debris. Use a shop vacuum to eliminate dust. Inspect every section carefully by tapping across surfaces listening for hollow sounds indicating loose plaster. Mark areas where plaster has separated from lath backing. Locate and mark all wall studs. Since you will fasten panels through plaster into studs, knowing their exact location is essential. Use a stud finder rated for plaster walls. Mark stud locations clearly with pencil. Address moisture issues completely before starting. Fix water damage, leaks, or moisture sources permanently. Allow damp plaster to dry completely. Check electrical boxes and install box extenders before hanging panels. Step-By-Step Guide To Installing Drywall Over Plaster Installing drywall over plaster follows a systematic process requiring attention to detail. Following these drywall over plaster steps carefully results in professional-quality walls. Measuring And Cutting Drywall Measure wall dimensions carefully, accounting for ceiling height and obstacles like windows or doors. Standard drywall sheets come in four-foot by eight-foot panels. Plan your layout to minimize seams and waste. Horizontal installation often works better for standard room heights. Cut drywall using a utility knife and straightedge. Score the paper face deeply, then snap the panel backward along the score line. Cut the paper backing to complete separation. For openings around outlets, measure precisely and cut carefully with a drywall saw. Fastening Methods Two primary methods exist for attaching new sheets. The screw-through method involves driving drywall screws through both new material and existing plaster into wall studs beneath. Use screws long enough to penetrate studs by at least one inch after passing through both layers, typically requiring screws around two and a half inches long. Space screws appropriately, placing them every twelve inches along studs for walls. Drive screws