The Complete Wallpaper Installation Process in 2025
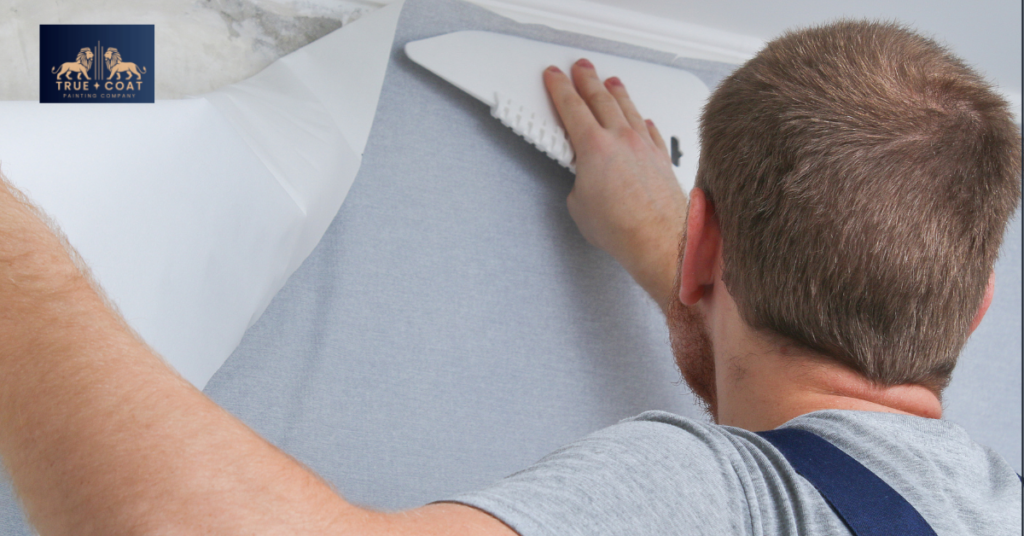
The wallpaper installation process transforms plain walls into stunning focal points that reflect your personal style. This method involves careful preparation, precise measurements, proper adhesive application, and skillful hanging techniques to achieve professional results. Whether you’re updating a single room or redecorating your entire home, understanding each step ensures a smooth application and long-lasting beauty. From selecting the right materials to applying the final seam, every detail matters in creating a flawless finish that will last for years. What Is the Wallpaper Installation Process? The wallpaper installation process consists of multiple stages that work together to create a flawless finish. Each phase builds upon the previous one, creating a foundation for success. Proper wall preparation forms the foundation of any successful installation. Walls must be clean, smooth, and completely dry before any wallpaper can be applied. Remove all existing wallpaper, loose paint, or debris from the surface. Fill any cracks, holes, or imperfections with appropriate filler material. Surface Preparation Sand rough areas until completely smooth to the touch. Wipe down walls with a damp cloth to remove dust particles. Allow walls to dry thoroughly before moving forward. This preparation stage determines how well your wallpaper adheres and how long it lasts. Taking time to properly prepare surfaces prevents future problems like peeling or bubbling. Material Selection Choosing the right wallpaper type affects both the installation method and final appearance. Vinyl wallpapers offer durability and easy cleaning, making them perfect for high-traffic areas. Traditional paper wallpapers provide classic beauty and come in countless patterns. Non-woven wallpapers resist tearing and remove easily during future updates. Pre-pasted options simplify application but may require additional adhesive in some cases. Consider room conditions like moisture levels when selecting materials. Tools and Supplies Gathering the correct tools before starting saves time and frustration. Essential items include a smoothing brush or plastic smoother, sharp utility knife, measuring tape, level, pencil, and cutting mat. You’ll also need a sponge, bucket of clean water, and appropriate adhesive if using unpasted wallpaper. A plumb line or laser level ensures perfectly straight installation. Quality tools produce cleaner cuts and smoother application. How the Wallpaper Installation Process Works Understanding the technical aspects of installation helps you appreciate the skill involved in professional work. Each step follows a specific sequence for optimal results. Accurate measurements prevent waste and ensure pattern alignment. Measure wall height from ceiling to baseboard, adding extra inches for trimming. Calculate the number of strips needed by dividing wall width by wallpaper width. Account for pattern repeats when cutting strips to length. Planning your starting point is essential, typically beginning at the least visible corner or beside a window. Mark vertical guidelines using a level to keep strips straight. This planning phase saves materials and prevents frustrating mistakes during application. Taking measurements twice ensures accuracy before cutting any wallpaper. Cut wallpaper strips slightly longer than needed to allow for adjustments. Match patterns carefully when cutting multiple strips from the same roll. For pre-pasted wallpaper, immerse each strip in water according to manufacturer directions. Non-pasted varieties require applying adhesive to either the wall or paper back. Let pasted strips “book” by folding ends together, allowing adhesive to activate properly. This resting period typically lasts five to ten minutes. Position the first strip along your marked guideline, leaving excess at top and bottom. Smooth from center outward using your brush or smoother tool, removing air bubbles as you work. Press firmly along edges to ensure complete adhesion. Trim excess paper at ceiling and baseboard using a sharp blade for clean edges. Wipe away excess adhesive immediately with a damp sponge. Each subsequent strip should butt seamlessly against the previous one without overlapping. Why Proper Wallpaper Installation Process Matters Following the correct wallpaper installation process determines whether your project succeeds or fails. Professional techniques produce results that last for years. The difference between amateur and professional installation becomes apparent over time as properly installed wallpaper maintains its beauty while poorly applied wallpaper develops problems. Improper installation leads to various issues that compromise appearance and longevity. Bubbles form when air gets trapped beneath the surface during application. Peeling edges occur when insufficient adhesive was used or walls weren’t properly prepared. Visible seams result from incorrect butting or stretched paper. Pattern misalignment happens without careful planning and measuring. Mold growth can develop behind wallpaper applied to damp walls. Professional installers know how to prevent these problems through experience and proper technique. Correctly installed wallpaper maintains its beauty for many years with minimal maintenance. Proper adhesion prevents premature peeling or lifting at seams and edges. Smooth application without wrinkles or bubbles preserves the pattern and texture. Professional finishing techniques protect vulnerable areas like corners and transitions. Quality installation also makes future removal easier when you’re ready for a change. The time invested in proper installation pays dividends through lasting performance. Hiring experienced installers ensures your wallpaper looks exactly as intended. Professionals understand how different materials behave during application and adjust techniques accordingly. They possess the tools and knowledge to handle challenging situations like high ceilings or difficult corners. Expert installers work efficiently, completing projects faster without sacrificing quality. Their trained eye catches potential issues before they become visible problems. Professional services deliver consistent, beautiful results that enhance your space. Tips for a Successful Wallpaper Installation Process Several practical considerations help ensure your installation goes smoothly from start to finish: Some situations benefit from professional expertise rather than attempting DIY installation. Complex patterns requiring precise alignment challenge even experienced homeowners. Large rooms or high ceilings demand specialized equipment and techniques. Delicate or expensive wallpaper deserves professional handling to avoid costly mistakes. Commercial spaces require efficient installation that minimizes disruption. Contact experienced professionals for projects beyond your comfort level or when guaranteed results matter most. Additional Considerations for Wallpaper Installation Understanding the complete picture helps you make informed decisions about your project. Several elements influence the total cost of wallpaper installation. Material prices vary widely based on quality, pattern complexity, and manufacturer. Professional labor costs reflect the